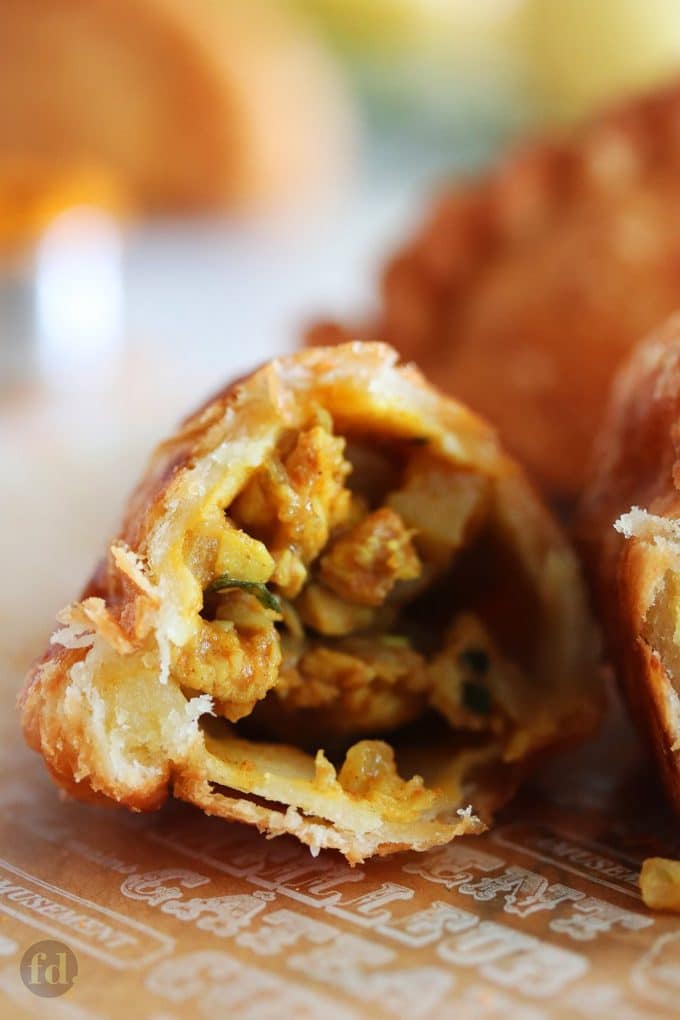
Deep-fried Chicken Curry Puffs
Deep-fried chicken curry puffs are crispy and flaky shortcrust pastries stuffed with curried chicken chunks, potatoes and egg. These are traditional street snacks that are sure to pack a delicious punch! Follow my step-by-step pictorial on how to make freshly fried puffs easily and confidently!
I have to confess that I’ve been on a chicken curry puff craze lately. Anyone who’s ever eaten a chicken curry puff will know that these deep-fried stuffed pastries always hit the spot!
Once you bite into that crispy, crumbly, buttery crust, and that delicious, savoury stuffing inside, you’re in love.
I hardly ever stop at one. I particularly enjoy eating generously sized puffs like the ones I’ll be showing you how to make here.
Making chicken curry puffs from scratch
Have you always felt daunted, even somewhat intimidated by the prospect of making curry puffs from scratch? If you do, then this post is for you.
It does take a little bit of work and time, I won’t deny. Then again, making anything yummylicious always does, don’t you agree? But you’ll find it’s so satisfying when you finally bite into a homemade curry puff!
I’ll be showing you here step-by-step how to to make these delicious curry puffs. I’ll also be punctuating my post with tips and suggestions from my recipe testing, so yours can turn out perfectly.

Types of curry puff pastry
Before making this home version of curry puffs, I had always satisfied my cravings with the ones sold by Old Chang Kee as well as 1A Crispy Puffs outlets.
If you’ve eaten the Old Change Kee variety, you’ll know that their puffs use a shortcrust type of pastry. When deep-fried, these puffs are deliciously crispy, crumbly and doughy. Oooh yeah … and buttery too, just my kind of love.

Then there are the spiral puffs, the type exemplified by 1A Crispy Puffs in their signature crispy puff, and others like it. Their puffs are kind of a fried puff pastry variety.
Typically, these are made with two types of pastry dough, a water-based dough made in it’s simplest form from flour and water, and an oil-based dough, usually made from flour and fat such as margarine, butter, ghee, lard or shortening.
The oil dough is wrapped inside the water dough, then rolled and folded repetitively in much the same way as with Western style puff pastry, thereby creating many alternating layers or spirals.
These pastry layers are tissue-thin, buttery, light and flaky, and literally melts in your mouth. Seriously, how can you not get hooked on THAT?


Here, I’m sharing a recipe for the shortcrust variety, just because this happens to be my favourite kind! In my humble opinion, it’s pretty dang good!!
This has gone through tweaks and many, many tries, and I’m super excited at how far I’ve come with this recipe!
I’d like to say that this is my best ever version yet, but you all know, the perfectionist in me will be working hard already to improve this recipe even further. For now, I think you’ll find this version truly worth your while!
This recipe will give you beautiful golden brown puffs when deep fried at the right temperature (see Tip #11 below). The crust of the puff is crispy, flaky, crumbly. The buttery flavours are subtle, but distinct, without tasting overly rich or greasy.
When you get past the pastry crust, you’ll bite into a tender, doughy pastry crumb just as you get your first taste of the curried chicken and potato stuffing.
Can curry puffs be made ahead of time?
Absolutely, yes! In fact, if you’re in for a busy week with little pockets of time in between, you can do everything ahead of time.
That goes for the curried chicken and potato filling, as well as the pastry dough. You can even fill and shape the puffs, and freeze these ready-made puffs for later frying.
Do take a moment to read the recipe notes I’ve left to the end of the recipe instructions on how to store, chill and/or freeze for later, as well as how to re-heat leftovers.
So, are you feeling excited to get going? Great, ‘cos I am too!
Let’s make curry puffs!
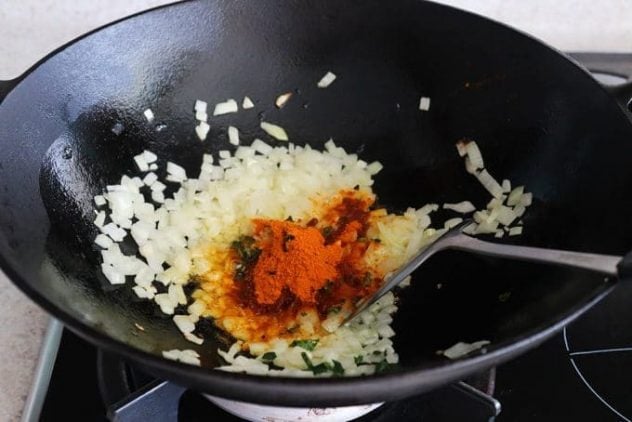
First, we cook the filling.
We cook the filling first so that it has time to cool completely by the time you’re ready to fill and shape the puffs.
In a hot wok with some oil, fry finely chopped onion till softened. Add chopped garlic, curry leaves (optional) and curry powder, stir fry till aromatic.
Tip #1: Slice or dice chicken and potato into regular-shaped cubes no bigger than 1-cm. It will be easier to fill and seal, and to shape uniformly. But you CAN have it chunky, if you like your filling with extra bite!
Put in diced potatoes, fry for a minute to mix well. Then add water, and simmer until potatoes are just softened.
Next, add the diced chicken, and continue to stir fry until meat is cooked. Let the filling cook until it becomes dry. Flavour with sugar and salt.
Tip #2: If you like your filling a little mushy, as I do, or not too dry, once the potatoes are softened, and before adding the meat, mash half of them with a fork or potato masher. The semi-mashed potatoes will hold the chicken chunks together, making the filling more moist and compact.
Scoop out and set aside to cool completely. At this point, we’ll need to hard-boil the eggs, peel them and slice each into 6 wedges.


Tip #3: Do note that for the curry spices, chicken and potato flavours to marry well and come through, it should be seasoned with enough salt to accentuate the flavours. Sugar helps to blunt any bitterness in the curry spices, and balance flavours. Obviously, you add only as much salt or sugar as is comfortable, to your taste.
Next, we prepare the pastry dough.
Combine the pastry dough ingredients in a mixing bowl. Rub in gently with your fingers until the mixture resembles fine breadcrumbs.
Then add the water-egg mixture. Mix in with fingers just long enough till you get a fairly smooth dough, and the sides of the bowl have come clean.
Cover with a clean, damp cloth or cling wrap, and let it chill for 30 minutes.
Tip #4: To ensure a tender pastry crumb, mix just enough with your fingers, to get a fairly smooth dough, picking up the loose flour until the sides of the bowl come clean. Do NOT knead or over-work the dough.


Tip #5: Grate cold butter (right out of the chiller) into the flour mixture with a vegetable peeler. It will incorporate more quickly and evenly, and keep the dough temperature cool.
Tip #6: Keep unused pastry dough, as well as filled pastries as cold as possible by chilling in the refrigerator as you make these. This is to prevent the butter from melting into the flour, so that it can instantly make steam when it comes into contact with hot oil during the frying process, which makes for a light and flaky crumb.
Fill and shape the puffs.
Now, we’re ready for the fun part! Have everything ready on your counter – extra flour for dusting (if you need it), cooled curry filling, and sliced egg wedges.
Prepare a pan or tray lined with baking paper. You’ll be placing your filled curry puffs here, so you can easily place this tray in the chiller or freezer. Divide dough in half, keep one half chilled until ready to use.
Roll out dough between two sheets of baking paper to 3-mm thickness. For roughly fist-sized puffs, cut into 11-cm (4.5-inch) rounds. For smaller puffs, cut into 9-cm (3.5-inch) rounds using a cookie cutter.
Tip #7: If you don’t have the right-sized cookie cutter, you can improvise using empty (but clean!) cans or plastic/metallic jar caps to cut into the pastry.
Alternatively, the pastry can be rolled into a long sausage, and cut or divided into 9 -10 (large) /12 (smaller) equal portions. Round each into a ball, then roll out into rounds.


Spoon 1 heaped tbsp of filling onto the centre, and top with an egg wedge. If making smaller puffs, spoon about 2 heaped tsp of filling.
Enclose the filling, press to seal the edges. OH YES, VERY IMPORTANT! Keep a clean, damp cloth nearby to clean off any curry stains on your fingers, when handling the pastry dough.
To flute the puff, start at the end nearest to you. Use the tips of your thumb and index finger to flip a small width of the pastry edge over on itself.
Pinch down onto the dough to ‘glue’ it in place. This will create a pointed tip at the plain edge (see photos below).
You then flip over a finger width of this pointed edge over, and pinch down. Work along the edge, keeping the angle and width of each flute consistent, until you reach the other end.
Creating the fluted edge gets better with practice, so don’t worry if your puffs aren’t looking as nice as you’d like.
I’m sorry I couldn’t get this on video, hopefully in my next update! Alternatively, you can use a fork and press lightly into the sealed edges.
Tip #8: If the cut rounds shrink a fair bit, you can roll over lightly but keep the shape round or slightly oval.
Tip #9: An optimal thickness for the pastry shell is 0.3 mm, for a crispy, crumbly crust. If the pastry is rolled too thin, it may also be prone to tearing when you try to fill or shape the puff.
If that happens, simply tear a bit of leftover dough and patch the tear. If you enjoy thicker pastry crusts, be sure to fry long enough at the optimal temperature to ensure the dough is cooked through (see Tip #11).


Tip #10: When pressing and sealing the edges, do not press the edges too thin, and make sure you have at least 1-cm border all around. This will allow you enough pastry at the edges to create the fluted pattern.
Gather the left over dough together into a ball, and re-roll as before, cut, fill, shape, seal, and flute. Repeat until all the pastry dough is used up. Meanwhile, keep the filled pastries as cold as possible. Place the tray in the freezer or chiller, to prevent the butter from melting into the flour, while you prepare for frying.
Finally, fry the curry puffs.
Over a medium fire, heat up a deep skillet, pot or wok filled with enough vegetable oil to submerge the puffs.
When the oil reaches 170 to 175℃, preferably not exceeding 180℃, start with small batches, 3 puffs at a time. In this temperature range, the pastry should brown evenly to a lovely golden brown in 5 to 6 minutes.
Tip #11: Frying is such an essential finishing step to getting golden brown, crispy, flaky puffs, but often under emphasised. I have found that an ideal oil temperature range for frying this pastry to ensure even and perfect browning is between 170℃ to 180℃.
Fry in small batches, 3 to 4, to ensure the temperature stays in the optimal range. If the oil is too hot, the pastry may brown unevenly, cook too quickly or risk burning the surface before the dough layer inside has had enough time to cook through.
If the oil is not hot enough, the pastry may absorb too much oil, and may become and taste overly greasy.
Tip #12: Caution! Hot oil may sometimes foam up during the frying process with subsequent batch frying, due possibly, to reaction between hot oil, water content and baking powder. Exercise caution by using deep frying pot. Put puffs into the hot oil one at a time, allowing 15-20 seconds to lapse in between.
This recipe should yield 9 to 10 large fist-sized puffs, or 12 smaller puffs. Feel free to make your own size.
Of course, these are best eaten freshly fried while still warm, on the day they’re made, to enjoy them at their crispiest and flakiest!
Leftovers can be made just as good if you store these wrapped individually in food grade paper. Store in an air-tight container or sealed Ziploc bag, and keep in the refrigerator.
Just read my recipe notes below on how to re-heat leftovers in a toaster or oven to get them crisp and yummy-licious again!
Now, enjoy!! Don’t forget to share your photos if you try these.
Tag #foodelicacy or @foodelicacy, so I can see your creations and drool away with you!

Deep-fried Chicken Curry Puffs

Ingredients
For the curry filling:
- 150 g chicken breast without skin
- 150 g potatoes peeled
- 135 g yellow onion peeled
- 3 garlic cloves peeled
- 2 tbsp meat curry powder
- 12 curry leaves
- 1 tsp sugar or to taste
- ½ plus 1/8 tsp salt or to taste
- 1 cup water more/less as needed
- 2 large eggs hard-boiled, peeled (optional)
For the pastry dough:
- 330 g plain flour
- 18 g rice flour
- ¾ tsp corn flour
- ¾ tsp baking powder
- 8 g salt
- 20 g sugar
- 8 g egg yolk no typo here, it is EIGHT g only
- 114 g water
- 128 g unsalted butter cold
- 20 g shortening I use Crisco
Instructions
To cook the filling:
- Dice chicken meat and potatoes into 1-cm cubes. Season chicken with 1/2 tbsp of the curry powder and 1/4 tsp of the salt. Finely chop onions, garlic and curry leaves. Meanwhile, slice hard-boiled eggs into 6 wedges each.
- Heat up 3 tbsp oil in a wok or skillet over medium heat. When hot, fry onion until softened. Add chopped garlic, curry leaves, and remaining 1 1/2 tbsp curry powder, and continue to stir fry until fragrant. Add potatoes, fry for 1 min to mix well. Pour in water, and let simmer until potatoes are almost soft, and mixture is almost dry. If the mixture gets dry before potatoes are soft enough, add 1 to 2 tbsp water to prevent drying out, as and when needed. Add chicken, continue to stir fry until cooked. Season with remaining 1/4 plus 1/8 tsp of salt, and 1 tsp sugar, or to taste (note: the curry stuffing will be more flavourful if it is just a little saltish, but suited to your taste). Once mixture is dry, dish out and allow to cool completely.
To make the pastry dough:
- Sift plain flour, rice flour, corn flour and baking powder into a large mixing bowl. Grate (or dice) cold butter over the flour mixture. Add shortening. Using your fingers, gently rub into the flour mixture, until it becomes sandy and resembles fine breadcrumbs.
- Dissolve salt and sugar in water. Add egg yolk and stir till well mixed. Make a well in the centre of the flour mixture, pour in the water mixture. Mix in with your fingers until the dough comes together (it will be quite sticky at first), picking up all the loose flour until the sides of the bowl comes clean. Do NOT knead or overwork the dough.
- Cover dough with a damp tea cloth. Let dough rest and chill in the refrigerator for 30 minutes. It should be cool but soft enough for handling. Meanwhile, line a large baking tray with baking paper.
- Cut dough into half. Keep one half covered and return to the chiller. Roll out dough half between two sheets of baking paper to 3-mm thickness. Cut out 11-cm/4.5-inch rounds for large puffs (or 9-cm/3.5-inch rounds for smaller puffs). Place an egg wedge in the centre (if using), and spoon 1 heaped tbsp of stuffing (or 2 heaped tsps for smaller puffs) over the egg. Enclose the filling by bringing the top and bottom halves of the pastry over the stuffing to meet in the centre. Seal by pressing and fluting the edges. Space puffs slightly apart on prepared tray. Gather remaining pastry dough into a ball and re-roll, cut, fill, seal and flute.
- Repeat with the other dough half, until all pastry is used up. Once done, place the tray with the puffs in the chiller, while you prepare and heat up the oil for frying.
- Fill up a fairly deep medium-sized pot or skillet with enough oil to submerge the puffs, or to a depth of 3-cm/1 1/2 inches (for safe frying, the pot used should be deep enough to leave 1 1/2 – 2 inches above the oil level). Heat oil over low-medium heat to a temperature between 170°C to 180°C (350°F to 360°F). Fry 3 to 4 curry puffs at a time, turning over occasionally to get even browning, for 5 to 6 minutes or until golden brown. Do NOT allow oil to get too hot (over 185°C), reduce the heat/fire as and when necessary. Drain fried curry puffs on a metal strainer placed over paper towels. Best eaten warm on the same day.
- (CAUTION! Hot oil may sometimes foam up during the frying process with subsequent batch frying, due possibly, to reaction between hot oil, water content and baking powder. Exercise caution by using deep frying pot, put puffs into the hot oil one at a time, allowing 15-20 seconds to lapse in between.)
Notes
- Tip #1 : Slice or dice chicken and potato into regular-shaped cubes no bigger than 1-cm. It will be easier to fill and seal, and to shape uniformly. But you CAN have it chunky, if you like your filling with extra bite!
- Tip #2 (optional): If you like your filling a little mushy, as I do, or not too dry, once the potatoes are softened, and before adding the meat, mash half of them with a fork or potato masher. The semi-mashed potatoes will hold the chicken chunks together, making the filling more moist and compact.
- Tip #3: Do note that for the curry spices, chicken and potato flavours to marry well and come through, it should be seasoned with enough salt to accentuate the flavours. Sugar helps to blunt any bitterness in the curry spices, and balance flavours. Obviously, you add only as much salt or sugar as is comfortable, to your taste.
- Tip #4: To ensure a tender pastry crumb, mix just enough with your fingers, to get a fairly smooth dough, picking up the loose flour until the sides of the bowl come clean. Do NOT knead.
- Tip #5: Grate cold butter (right out of the chiller) into the flour mixture with a vegetable peeler. It will incorporate more quickly and evenly, and keep the dough temperature cool.
- Tip #6: Keep unused pastry dough, as well as filled pastries as cold as possible by chilling in the refrigerator as you make these. This is to prevent the butter from melting into the flour, so that it can instantly make steam when it comes into contact with hot oil during the frying process, which makes for a light and flaky crumb.
- Tip #7: If you don’t have the right-sized cookie cutter, you can improvise using empty (but clean!) cans, or with plastic/metallic caps of jars or containers, to cut into the pastry. Alternatively, the pastry can be rolled into a long sausage, and cut or divided into 6 (large) /8 (smaller) equal portions. Round each into a ball, then roll out into rounds.
- Tip #8: If the cut rounds shrink a fair bit, you can roll over lightly, but keep the shape round or slightly oval.
- Tip #9: I find that an optimal thickness for the pastry shell is 0.3 mm, for a crispy, crumbly crust. If the pastry is rolled too thin, it may also be prone to tearing when you try to fill or shape the puff. If that happens, simply tear a bit of leftover dough (dough left over after cutting out the rounds) and patch the tear. If you enjoy thicker pastry crusts, be sure to fry long enough at the optimal temperature to ensure the dough is cooked through (see Tip #11).
- Tip #10: When pressing and sealing the edges, do not press the edges too thin, and make sure you have at least 1-cm border all around. This will allow you enough pastry at the edges to create the fluted pattern.
- Tip #11: Frying is such an essential finishing step to getting golden brown, crispy, flaky puffs, but often under emphasised. I have found that an ideal oil temperature range for frying this pastry to ensure even and perfect browning is between 170℃ to 180℃. Fry in small batches, 3 to 4, to ensure the temperature stays in the optimal range. If the oil is too hot, the pastry may brown unevenly, cook too quickly or risk burning the surface before the dough layer inside has had enough time to cook through. If the oil is not hot enough, the pastry may absorb too much oil, and may become and taste overly greasy.
- Tip #12: CAUTION! Hot oil may sometimes foam up during the frying process with subsequent batch frying, due possibly, to reaction between hot oil, water content and baking powder. Exercise caution by using deep frying pot, put puffs into the hot oil one at a time, allowing 15-20 seconds to lapse in between.
- Fried curry puffs should be allowed to cool to room temperature before storing. Always store in sealed, air-tight containers. Keep chilled in the refrigerator for 2 to 3 days.
- To reheat, heat up an oven to 175°C (or use ‘warm’ setting on your oven if available), and place puffs on a heat-proof pan or plate. Heat for 10 to 12 mins, or until the pastry crisps up. To avoid over-browning the puffs, you can place a sheet of aluminium foil over the puffs. If using a counter-top toaster oven, depending on your toaster settings, re-heat for 8 to 10 mins, covered with aluminium foil. Remove from toaster or oven, and let stand for 5 minutes to allow pastry to crisp up.
- The curry filling can be cooked in advance and kept chilled for up to 5 days, or frozen for up to a month. Chill extra or left-over filling in air-tight glass containers (curry tends to stain plastic containers), or store in well-sealed freezer bags if storing in the freezer. Thaw in the fridge a day ahead of when you intend to use it.
- The pastry dough can be made in advance and stored in well-sealed bags. Wrap the pastry dough tightly with two layers of cling wrap, keep in a well-sealed freezer bag, and store in the refrigerator for up to 5 days. On the day you intend to make the puffs, remove from the refrigerator and allow it to soften at room temperature, in the bag. You only need it to be soft enough, but still cool, to handle easily for rolling, cutting, shaping, etc.
- Alternatively, you may roll out the pastry, cut and stuff the curry puffs and freeze these ready-made puffs in well-sealed freezer bags. When ready to cook, remove from the freezer, no need to thaw. When frying frozen puffs, heat oil to 180°C (360°F), and maintain oil at this temperature for frying remaining frozen puffs.


Tried it. Overall good, crispy on the outside but a bit gooey in between.
Is it due to frying time not long enough?
Hi Anne, thanks for the feedback! I’ve never had the puffs get gooey inside. May be due to a few possibilities – a longer frying time may be needed, but also make sure the puff pastry dough isn’t too thick; the oil needs to heat up to the recommended frying temperature before frying each batch; also, when you take the fried puffs out of the oil, you’ll want to make sure they sit on a metal rack so the heat and moisture can escape otherwise the puff will absorb it back into the dough. The last thing I can think of as well is that the puff filling shouldn’t be too moist or wet, which can also cause the dough to absorb the moisture. Hope this helps!
Hi Celia, I am so glad I found this recipe. Just like my favorite Old Chang Kee’s pastry. So light, flaky yet very tender.
Thank you for sharing.
Hi Jackie, thanks so much for sharing and leaving a review. Much appreciated! I’m so thrilled this turned out to your liking. Have a Happy New Year!
Hi Cellia
I’ve made your dough recipe and it was superb – flaky and light = very much like the Old Chang Kee curry puffs in Singapore. The use of the different flours produce a wonderful result.
The curry puffs froze well and I fried them with no diminished taste/quality.
Your instructions were excellent, too.
Thank you.
June
June, that’s wonderful to hear! I’m thrilled this recipe worked out to your satisfaction. Thank you so much for taking the time to leave a review. Have a wonderful week ahead!
Thank you so much for writing in a positive review, June! I’m thrilled these curry puffs worked out wonderfully for you, made fresh or frozen. Have a wonderful week!
Hi Celia,
Thank you for this recipe! I was wondering if you have any tips for when the pastry bubbles in a deep fryer (even with the right temperature)? I know it comes from the steam inside the pastry, but is there any way I can avoid this? If it bubbles it will eventually explode and the filling starts to ‘leak’ out. It also doesn’t look nice in the end. I hope you have the golden tip for me! Thank you in advance for taking the time to respond!
Hi Derrick, thank you so much for writing in. The bubbles within the pastry are actually what gives the shells its flaky texture so it’s a desirable texture, however moisture of the filling itself will cause outward pressure to build up as the shells are fried, creating an outward pressure. In my experience with the same issues, I have found that rolling the pastry a little thicker, so it can hold in the steam during the frying process, helps prevent this. The filling typically leaks out if the edges weren’t sealed well enough or if the pastry at the edges are too thin, even when pleated. Also, I would recommend chilling (even freezing) the filled shells for at least half an hour before deep frying, it would require a slightly longer frying time but the shells usually hold well. Finally, I cook my fillings a little on the dry side (I personally prefer a mashed potato texture), so that there’s less moisture to start with. I’m not sure if these are golden tips, but they’ve worked for me! Would love to hear how and which methods work better for you the second time around. Have a great week ahead!
Hi, definitely going to try this. Craving for OCK.
Is it 8g of yolk? How much does that equate to? 1yolk? Or less?
Hi Bindu, thank you for writing in! Yes, it is 8 g of yolk, which is about half of one egg yolk.
This is absolutely delicious. Just like OCK. Love it! I am curious how would the pastry be affected if whole egg is used instead of just yolk. Have you tried using whole egg for the recipe?
Thank you for your feedback, Serlyn! I’m so glad you enjoyed this. I haven’t used the whole egg, so I can’t say how it would affect the pastry. I reckon that the extra water content in the egg white could lead to more gluten development, so the pastry might be less tender but still flaky and flavourful, if you are careful not to over-work the dough. If you try it out, would love to hear how it turns out!
Hi Celia, thank you for the detailed recipe with loads of tips for a newbie like me. The taste is so good! The crust is so flaky and fragrant. I would like to ask what are the white specks found on the crust after frying? Thanks!
Hi June! I’m happy to hear you enjoyed it, and thank you for sharing. I’m not sure what the white specks could be as I’ve never had them on my puffs. My only guess is that it could be flour that wasn’t incorporated completely into the dough, though I can’t say for sure.
Hi Celia, so glad to see a recipe that can bring some semblance of OCK to us while residing overseas. What type of pre-made pastry could we use if we’re not capable of making the pastry from scratch as per your recipe? My preteen daughter is keen to try the recipe. Thanks!
Hi Marie, thank you so much for writing in! Actually, I haven’t used pre-made pastry for these curry puffs because my goal was to get as close as possible to OCK. Using pre-made ones wouldn’t get it anywhere near, I’m sorry to say. But you can use pre-made puff pastry or pie pastry, if that’s easier to get where you are. I highly recommend making from scratch, though, and it’s very easy to do. Hope you’ll give it a go!
Tried them and they turned out beautifully. They are divine my family loved them and will definitely be making them over and over again. Thank you Celia
Hi Debbie, thank you so much for sharing! I’m thrilled these worked out so well! Stay safe and have a great week ahead!
Thank for sharing this wonderful and detailed recipe. Just tried it and marvelled at the outcome.
Hello Olivia, that’s wonderful to hear! I’m so thrilled you loved how it turned out. Many thanks for sharing!
Hi Celia. Just subscribed and all these recipes sound absolutely delicious. Am very familiar with most of them as I’m eurasian and cook a lot of them too. Back to these wonderful curry puffs. May I ask if the pastry dough can be made using a machine and dough hook as well? Have you tried it? My hands are always very warm and I find it’s hard getting pastry to the way it should be. It would help so much if I could get the same results using my machine? Ta!
Hi Denise, thank you for subscribing and thrilled to have you here! I love Eurasian food and hope to cook up more of your wonderful Eurasian cuisine. Would love to hear from you some suggestions on which I should try! Yes,you can certainly make the pastry dough with an electric mixer. Start with a paddle attachment to mix in the butter and shortening with flour until the mixture resembles breadcrumbs. Switch to a dough hook to mix in the water mixture, and on low speed. Only mix until the dough comes together, to get a tender, buttery and flaky pastry. Hope this works out well!
Thanks for sharing this recipe. I made it over the weekend and it was a hit! Didn’t have shortening so used all butter and it was very good too. You really brought OCK to me.
Hi Therese, thank you so much for sharing! I’m thrilled it was enjoyed!
Hi! May I know how does the 8g egg yolk affect the texture of the curry puff? Can it be omitted? Thanks.
Hi Sharon, egg yolk in the pastry dough, though in small amount, has a tenderising effect, as well as adds some flavour and a little colour. You can omit it if you like, though I have never done so and can’t say how much omitting it affects the texture.
Super good! The crust is super crispy just like Old Chang Kee. Thanks so much!
Hi Rina, so great to hear it!?Thank you for sharing and hope you can give the recipe the stars you think it deserves!
What a great recipe and what a beautiful website, i would love to make this recipe but where i live in south east asia it’s not possible to get all the ingredients and not being American i didnt understand some things you mentioned, what a shame, i wish there was a cut down version with bought puff pastry (i can get that here) but for now i’ll just admire your super close up photos of the curry puffs, its dang good, whatever that means.
Hi Shaun, the ingredient list is at the end of the post, is it not appearing for you? My only guess is that it may be a browser issue. Perhaps you could try clearing your browser cache, and reload the post, or reload on different browser or device?
Hi Celia!
Just wondering any substitute for shortening?
Hi Umairah, sorry for the late reply, I was having some issues on my site and comments were not coming through for some reason. It’s all good now. An acceptable substitute for shortening is often lard, or butter or margarine, but because butter and margarine both have higher water content than shortening, it may affect the outcome of the baked good, depending on what you’re baking.
Hi,I know you said frying the curry puffs are essential but I was thinking, if I were to bake it, would that work?
Hi Yasmin, I haven’t tried baking puffs made with this pastry, but it is essentially a shortcrust pastry, so I would think and hope that it turns out well too. If you do try baking it, could you share please? I’d love to know!
I really want to try this! But can you convert the pastry dough ingredients to cups for me please ?
Hi Rafiqa, I’m sorry but I’m not sure how to convert it accurately into cups, and it would not work for all the ingredients listed either, especially for very small quantities. In my humble opinion, the recipe in weights would yield more consistent and reliable results as well.
Wow! Such detailed instructions in the recipe! Great work! Must have taken a lot of time to do this. The curry puffs are super tasty!
Thank you so much for your kind comments and feedback, Pei Ling! Glad you enjoyed them!?