Chinese-Style Crispy Sweet and Sour Pork
The best home-cooked crispy sweet and sour pork recipe! Cook a restaurant-quality crispy sweet and sour pork using a double dredge and double fry technique. Plus, don’t miss out on the best ever recipe for a perfectly balanced sweet and sour sauce.
When it comes to favourite foods, hubs and I have one dish that we share a common love for – sweet and sour pork.

Back in the day, I used to enjoy this only in restaurants, when my family celebrated special occasions or festivities.
These days, you can find sweet and sour pork everywhere. I don’t have to tell you how delicious it is, because you already know it!
If you’re here reading this, you’re probably looking to make this at home. Well, I’m really excited to share with you a tried and tested recipe for crispy sweet and sour pork just like your favourite restaurant version!
And I’m going to show you how to nail this dish with a perfectly balanced sweet and sour sauce!

This is the same sweet and sour sauce that I use for my popular sweet and sour fish, and it NEVER FAILS.
I also have a more elaborate sweet and sour sauce that I use for cooking superior sweet and sour whole fish, and you’re welcome to try that as well.
Are you excited? I am, and there’s a lot to get into, so we’re going to hit the ground running!
What makes a good sweet and sour pork dish
Have you been cooking this dish enough times and aren’t quite satisfied, or feel like you’re just not getting it as good as your favourite restaurant or take-out version?
If you are, I know the feeling! I’ve been down that path too, more times that I can count.
I don’t know about you, but I’ve always been told that domestic gas hobs just aren’t strong or hot enough to create the characteristic crispy sweet and sour pork.
While there’s some truth to it, we still can achieve more than decent crispy pork in a home kitchen!
I’m going to show you how the process of double-dredging (coating) and double-frying the pork can achieve those crispy edges we’re after.
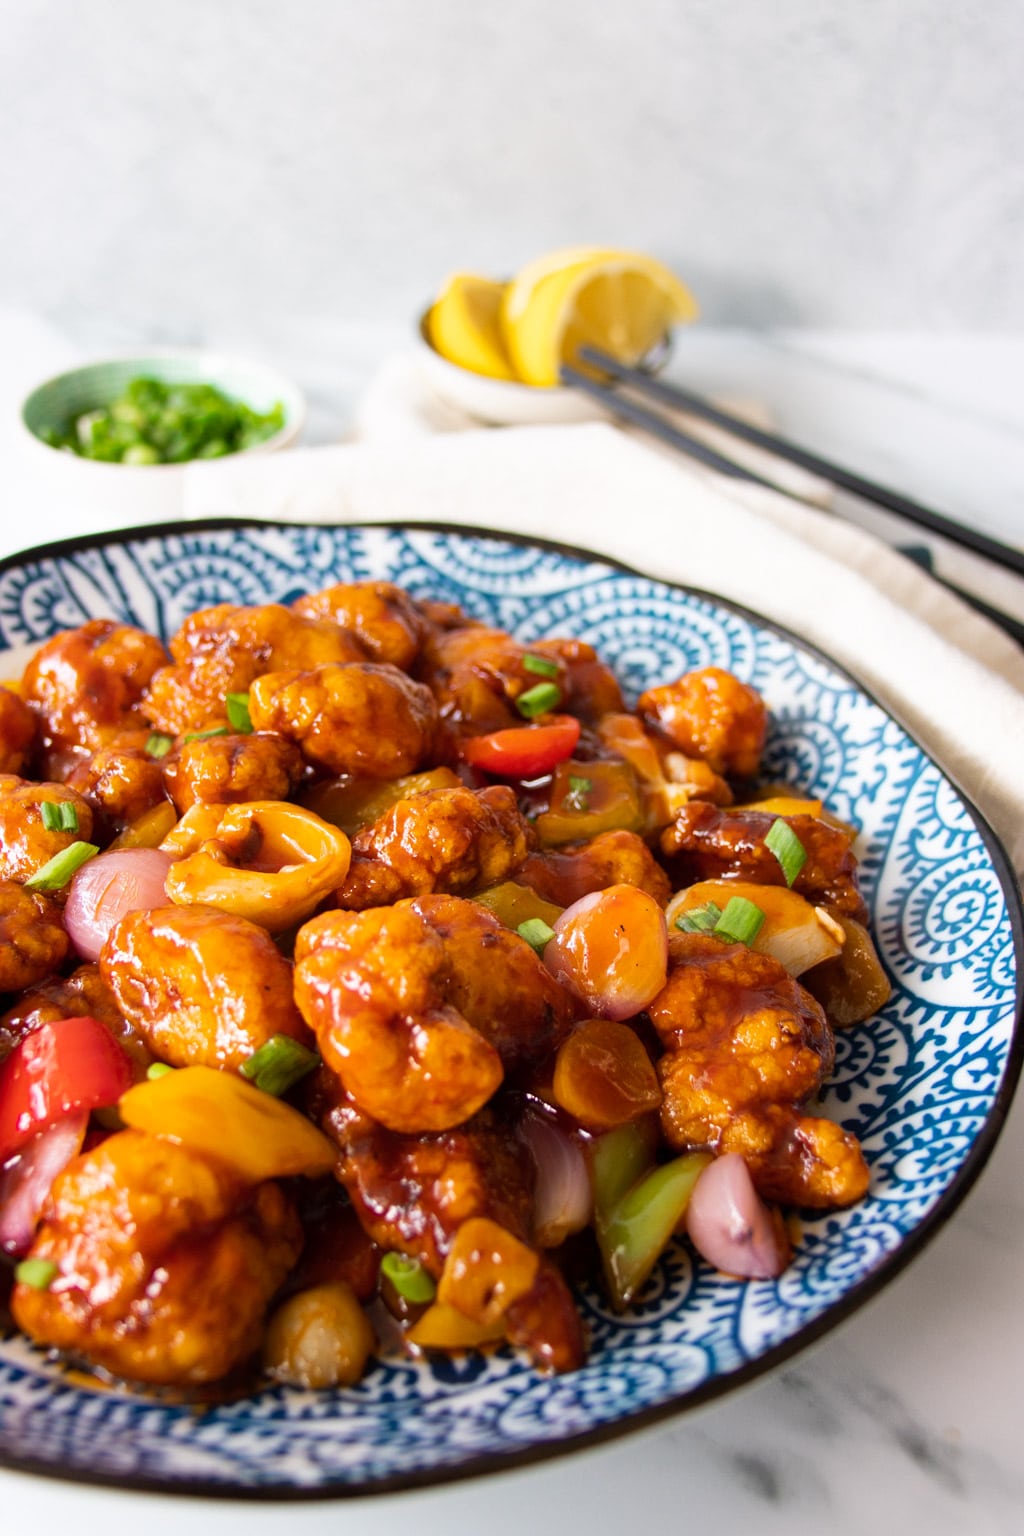
For me, a worthy dish of sweet and sour pork has:
- extra crispy pork nuggets on the outside, juicy and chewy on the inside. My greatest challenge used to be that nuggets didn’t stay crispy long enough, and turn soggy the moment they get tossed in sauce. While these pork nuggets are not going to stay crispy all the way, because even restaurant ones don’t unless they add specific ingredients, those crispy edges will last about 5 minutes once coated! I’d say that’s pretty good for homemade!
- super tasty fried pork nuggets! I’ve got a really full-flavoured marinade that you can’t afford to skip! It gives the meat just enough flavour to stand on its own, even without the sauce. Think chicken nuggets.
- thick, sticky, and perfectly balanced sweet and sour sauce! Nothing ruins a dish more than a poorly constituted sauce. This sweet and sour sauce tastes rich, bold and intense, and with no added water. It has the perfect consistency of a thick, sticky glaze that beautifully coats the nuggets and vegetables. No runny sauce!
Main ingredients
For sweet and sour pork
- Pork, preferably with a little marbled fat – read my tips on pork cuts below
- Bell peppers, use your favourites!
- Canned lychees or canned pineapples
- Garlic
- Shallots
- Spring onion
For sweet and sour sauce
- Tomato sauce (ketchup)
- Sweet chilli sauce
- Plum sauce
- Lemon juice
- Brown sugar
- Salt

For dredging (coating)
- Corn starch or corn flour
- Potato starch
- Beaten egg
Step-by-step: How to cook sweet and sour pork
In a nutshell, here are the few steps involved in cooking sweet and sour pork:
- Marinate pork – adds flavour that tastes so good once fried, even without the sauce
- Prepare the sauce – measure, mix and stir step you can get done in a minute.
- Double-dredge and double-fry – coats and seals in the juices for extra crispy pork nuggets.
- Final stir-fry – brings everything together beautifully in less than 5 minutes
Marinate pork
In a bowl, marinate the pork with salt, pepper, sesame oil, corn starch and Chinese wine. Set it aside for at least 30 minutes to allow the marinade to penetrate. If time permits, an overnight marinade in the chiller, covered, is even better.
Here’s a tip! I like to cut the meat into small nuggets, no bigger than ¾ to 1-inch cubes. They cook faster, and contain less juices, so they stay crispy for longer after the dredging and frying process.
Prepare the sauce
In a separate bowl, combine the sauce ingredients and set aside. Give it a good stir, then taste it. Feel free to adjust to your liking. Add more lemon juice to intensify the tang, or more brown sugar to sweeten up the sauce.
Double-dredge the pork
- Step 1: 1st coat/dredge – Roll the meat in corn starch (corn flour).
- Step 2: Dip in the beaten egg, to coat evenly. The egg will help the potato starch to adhere to the meat in the second time you dredge.
- Step 3. 2nd coat/dredge: Then roll again in the potato starch, and be sure to get the pieces coated all over. Shake off the excess, otherwise you’ll see white specks on the nuggets when you fry. Potato starch is the coating that fries till crisp, even crispier than flour, corn starch or corn flour.
- Step 4: Set the double-coated pieces in a separate plate. I find it easier to work in batches, so that I can be sure that all the pieces get coated and dredged evenly.

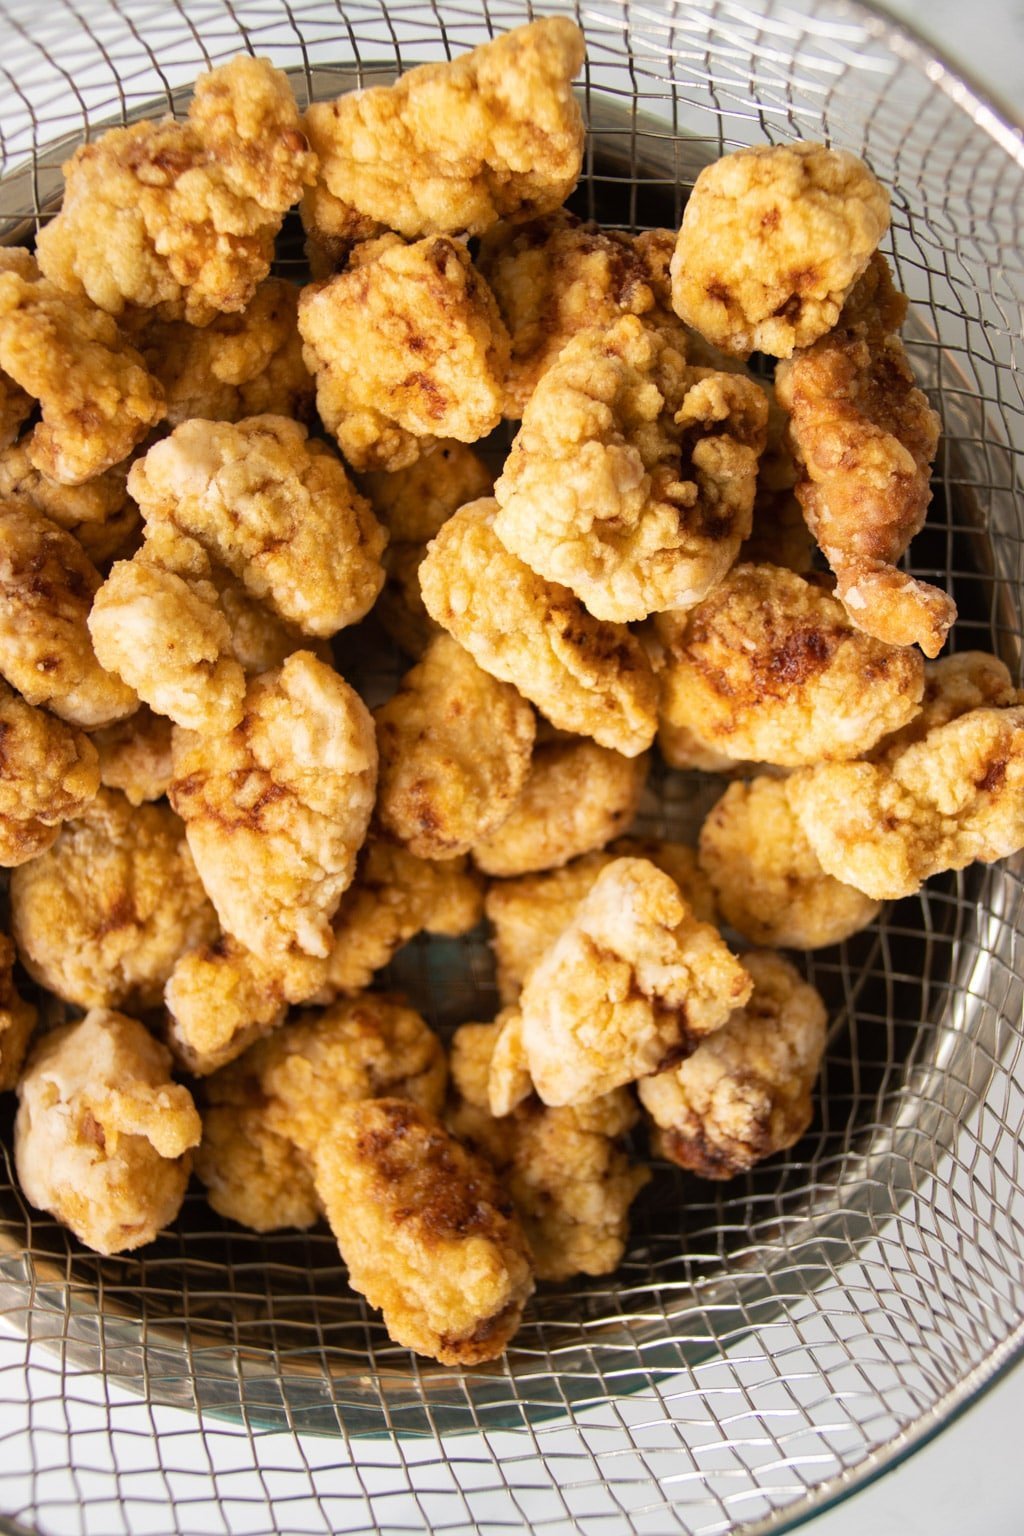
Double-fry the pork
The first fry is to cook the pork through, but it won’t crisp up yet.
- Fill a wok or skillet with oil till ¼ full. Heat it over high heat until very hot. You’ll want the temperature to be around 180°C (350°F). When adding the meat into the oil, just be sure not to over crowd them. Fry till just cooked, and the nuggets should be a pale golden brown, about 3 minutes.
- Remove with a slotted spoon, and drain the pieces on a wire rack or a wire basket. Do not drain on paper towels, because steam is still being released and all that moisture will be re-absorbed, making it soft before they’ve had the chance to crisp up.
- Allow the oil to get hot again, before tipping in the next batch. Repeat until you’ve fried all the meat pieces.


The second fry is key to getting that extra crispy pork!
The higher temperature maintained during the second fry actually removes excess oil. These make the fried nuggets less oily!
- Heat up the oil again but hotter this time. Tip in the fried nuggets again, working in batches as before, and fry until the nuggets turn a deep golden brown. This could take about 1½ or just under 2 minutes. Drain on a metal rack.
- Pour out the oil (the oil can be strained and re-used), leaving behind 2 tbsps for the final stir fry.


The final stir-fry
- Step 1: Heat up the 2 tbsps oil until hot. Fry the garlic until fragrant, then tip in the shallots, diced peppers and lychees. Fry for 10 to 15 seconds until vegetables just start to soften.
- Step 2: Pour in the sauce mixture, and stir for a few seconds to mix well with the vegetables. Let the sauce come to a rolling boil for about 10 seconds.
- Step 3: Tip in the fried pork pieces.
- Step 4: Toss vigorously for 10 seconds, making sure everything gets coated. Do not toss for too long, if you want it to stay crispy for as long as possible! And don’t add water! This sweet and sour sauce is meant to be thick and sticky. Turn off the heat, and dish out immediately onto a serving dish.
Once the nuggets are coated in sauce, they will start to lose their crispness but at a much slower rate. These will stay crisp for 5 minutes or so, much longer than they would have if they had not been double-fried. For home-cooked, I’d say that’s pretty good, wouldn’t you?


Tips on pork cuts
- Pork collar or pork collar butt is most recommended for sweet and sour pork as its versatile, beautifully marbled and has a remarkable flavour. It’s the part of the shoulder that runs from the base of the pig’s neck to the tip of the loin. It’s got just a teeny bit of fat, so it doesn’t dry out as much as other cuts like tenderloin.
- Pork shoulder butt is my next favoured choice, again for the little streaks of fat that makes this suitable for sweet and sour pork.
- Pork belly is a fatty cut, and you might find this too greasy. But I actually don’t mind using pork belly in this recipe. The fatty layers actually makes for very tasty fried pork nuggets. You can get leaner cuts of pork belly, as I usually do, and trim away the excess fat around the edges.
- Pork loin or tenderloin is not usually recommended because the meat tends to dry out quickly, especially when double frying it.

Sweet and sour pork is best eaten with steamed rice, or complement with my easy Chinese egg fried rice. And if you’re looking to make a complete Chinese meal, have a vegetable side dish of stir-fried nai bai with garlic.
Here are more recipes you might like:
- Mapo Tofu – Sichuan Stir-fried Pork and Bean Curd
- Braised Pork Belly and Eggs in Soya Sauce
- Chinese Eggplant with Garlic and Dried Shrimp (Meat-Free Version)
- Babi Pongteh (Nonya Braised Pork in Fermented Soy Bean Paste)
Tried this recipe? I’d love to see! Share your pics on Instagram and tag @foodelicacy or #foodelicacy.
Pin this recipe!
Crispy Sweet and Sour Pork
Ingredients
- 500 gm pork collar cut into 1-inch chunks
- 2 cloves garlic minced
- 6 shallots peeled and halved
- ½ green bell pepper cut into pieces
- ½ red bell pepper cut into pieces
- 6 – 8 canned lychees halved (or ¼ cup canned pineapple chunks)
- 1 stalk spring onion chopped
For sweet and sour sauce
- 5 tbsp tomato sauce ketchup
- 3 tbsp sweet chilli sauce
- 3 tbsp plum sauce
- 1 tbsp lemon juice
- 2 tbsp brown sugar tightly packed, or more to taste
- ¼ – ½ tsp salt to taste
For the pork marinade
- ½ tsp salt
- ½ tsp pepper
- 1 tsp sesame oil
- 2 tsp corn flour
- 50 ml Chinese wine 3 tbsp + 1 tsp
For double-dredging
- 3 tbsp corn starch or more as needed
- 3 tbsp potato starch or more as needed
- 1 egg lightly beaten
Instructions
- Marinate the pork
- Marinade the pork with all marinade ingredients. Set aside for at least 30 minutes.
- Prepare the sweet and sour sauce
- Combine sauce ingredients in a bowl and stir to mix well. Set aside.
- Double-dredge the pork
- Dredge #1 – Roll the meat in corn starch (corn flour). Dip in the beaten egg to coat evenly.
- Dredge #2 – Roll in potato starch, making sure to get the pieces coated all over.
- Shake off the excess, and set on a clean plate. Work in batches, so that all the pieces get coated and dredged evenly.
Double-fry the pork - Heat up wok over high heat and fill ¼ with cooking oil.
- Once the temperature reaches 180°C (356°F), fry the pork pieces in batches, making sure not to over crowd them. Fry till just cooked, and the pieces are a pale golden brown, about 3 minutes.
- Remove with a slotted spoon, and drain the pieces on a wire rack or a wire basket. Do not drain on paper towels.
- Allow the oil to get hot again, before tipping in the next batch. Repeat until you’ve fried all the pork pieces the firm time round.
- Heat up the oil again but hotter this time. Tip in the fried nuggets again, working in batches as before, and fry until the nuggets turn a deep golden brown. This could take about 1½ minutes or just under 2 minutes per batch. Remove and set on a metal rack.
- Pour out the oil (the oil can be strained and re-used), leaving behind 2 tbsp for the final stir fry.
- Final stir-fry
- Heat up the 2 tbsps oil until hot. Fry the garlic until fragrant, then tip in the shallots, diced peppers and lychees. Fry for 10 to 15 seconds until vegetables just start to soften.
- Pour in the sauce mixture, and stir for a few seconds to mix well with the vegetables.
- Let the sauce come to a rolling boil for about 10 seconds. Tip in all the fried pork pieces.
- Toss vigorously for 10 seconds, making sure everything gets coated. Do not toss for too long, and do NOT add water! This sweet and sour sauce is meant to be thick and sticky.
- Turn off the heat, and dish out immediately onto a serving dish. Serve hot while it’s crispy!

