Marble Chiffon Cake with Cocoa and Vanilla Swirls
A delicious marble chiffon cake with luscious swirls of cocoa and vanilla batters so you get the best of both! This chiffon cake turns out tender and moist with a super light, airy, and fluffy texture that won’t dry out.
I’m addicted to chocolate as much as I’m obsessed with vanilla, but sometimes I can’t decide which I’d want more of in a slice of cake. Thankfully, I have an easy solution that’s a delicious win-win – a marbled dessert with both chocolate and vanilla in it.
In fact, I can’t think of a more amazing flavour duo. If you love brownies with warm vanilla sauce or vanilla ice cream bars coated with thick cracking chocolate, then a marble cake is right up your alley.
Today, I’m sharing a light, delicious, and lower-calorie treat – a marble chiffon cake. This flavour duo takes the best of my tried and tested chocolate chiffon and vanilla chiffon cakes, so we won’t miss out on the intense chocolatey flavour of dark cocoa or the warm sweetness of vanilla in every slice.

Table of contents
Top 10 baking tips for chiffon cake success
If you’re new to chiffon cakes, I’ve got a couple of important tips to help you avoid the most common chiffon cake mistakes so you’ll get everything right on the get-go.
- Never grease the pan.
Pans with non-stick coating are a no-no because chiffon cake batters rise by ‘climbing’ the sides of the pan. This is how the cake gets its height and airy crumb. The best pans are chiffon or tube pans made of aluminium with a funnel and removable base. - Use the correct chiffon pan.
A chiffon will bake to a good height in the right pan size. If the pan is too large, the cake will be short. But if it’s too small, the cake will run out of space to expand and ‘climb’, eventually collapsing on itself. - Follow the recipe.
Use the ingredients specified, and only make substitutions once you’re sure how the recipe works. For instance, cake flour is recommended because its lower protein content bakes up softer and finer. Although you can use plain flour, it will significantly alter the intended texture of the cake. - Measure ingredients with a digital scale
Wherever possible, use a digital scale to measure ingredients (unless otherwise specified) because it will yield precise and consistent baking outcomes. - Use room-temperature ingredients.
You should pull cold eggs and milk out of the fridge at least 20 – 30 minutes before. Separate the eggs when cold (it’s easier), but let the whites warm to room temperature – they’ll whip up quicker, better and airier. - Separate eggs carefully.
I have the clumsiest fingers on earth, so trust me when I tell you that you musn’t get the tiniest speck of yolk in the whites. Just a trace of yolk fat will prevent the meringue from whipping up stiff. You’ll have to start over with fresh eggs. - Use grease-free bowls and beaters.
If you’re re-using bowls and the same set ofbeaters for different steps in the recipe, wash and dry them thoroughly before whipping up the meringue to remove any hint of grease. - Whip in one direction.
It took me forever to kick my old habit and stick with this. If you use handheldbeaters or a whisk, keep thosebeaters rotating in the bowl in the same direction throughout. This allows the meringue to build up a stable and airy structure steadily. - Beat the meringue until just stiff.
When the meringue is thick and starts to look smooth and glossy, stop and liftbeaters . To recognise when it’s at the right firmness, you’ll want to look for peaks that hold a firm shape from the base to the tips and curl over like a hook (see step-by-step pic #8 below). - Handle the batter gently.
When combining mixtures, be light and gentle with your technique to prevent the batter from deflating. You’ll have done good work to get a lovely and airy meringue, so don’t lose it at the end by over-working the batter and losing those precious air bubbles.

Ingredients for a marble chiffon cake
- cake flour. Using a low protein flour like cake flour creates a softer and finer cake crumb. You can substitute with pastry flour, or try making your own cake flour from scratch.
- baking powder. A small amount helps leaven the cake and gives it added lift.
- cocoa powder. Using Dutch-process cocoa makes the chocolate batter noticeably darker, intensifies the ‘chocolatey’ experience, and gives a richer and smoother flavour.
- eggs (6 egg whites, 5 egg yolks). I highly recommend using a scale to measure the yolks and whites as the egg sizes can vary from country to country. You’ll need 6 – 7 eggs, depending on the size of eggs used.
- caster sugar. Use caster sugar or any fine granulated sugar wherever a recipe calls for whipping up eggs. Finer sugar particles cut through the egg whites more effectively, trapping more air and ensuring the meringue reaches its optimal volume.

- milk. For flavor, I use full-cream dairy milk. Coconut milk, soy milk, almond milk, and oat milk make excellent substitutes if avoiding dairy. Bear in mind, some kinds of milk can affect the flavor of the cake.
- oil. Neutral-flavored oils like canola, sunflower, safflower, corn, or grapeseed work best. Melted coconut oil and some nut oils like white roasted sesame oil (not to be confused with traditional dark roasted sesame oil) are suitable substitutes as well.
- vanilla extract. Vanilla extract is twice as strong as essence, and has a warmer, stronger and more complex flavour profile.
- cream of tartar. Stabilises the meringue and minimises loss of trapped air bubbles in the cake batter.
- salt. Adds depth, heightens the flavour of other ingredients, and balances the sweetness in the cake batter. You don’t need much, a pinch goes a long way.
Step by step guide: How to make a marble chiffon cake
The steps written here are concise for purposes of illustration, but I’ve got you covered with detailed instructions included in the recipe card below.
Sift the dry ingredients
- Step 1: Sift together cake flour, baking powder, and salt
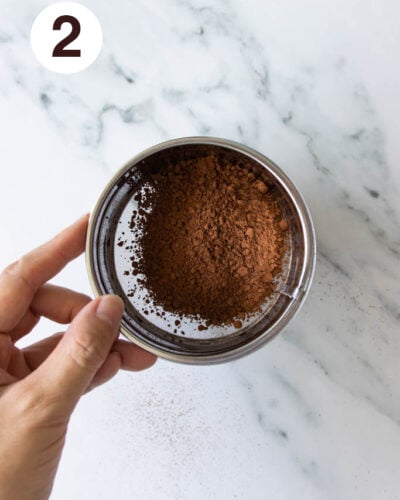
- Step 2: Separately, sift the cocoa powder.

Beat the yolks
- Step 3: Lightly beat the yolks with a whisk, then add the smaller lot of sugar.
- Step 4: Whip on medium speed using handheld
beaters or a stand mixer fitted with a whisk attachment, until the yolk mixture turns pale, triples in volume, and becomes thick and glossy (3 – 5 minutes).


Make the meringue
- Step 5: In a large, grease-free mixing bowl, combine egg whites, cream of tartar, and 1 tsp sugar.
- Step 6: Whip the whites on medium speed until thick and cloudy. When you lift the whisk, you should see soft peaks that barely hold their shape.


- Step 7: Beat in the rest of the sugar in 2 to 3 lots, keeping the speed medium.
- Step 8: Whip until the meringue forms peaks that are just stiff when you lift the
beaters or whisk. The peaks should hold a firm shape from the base towards the tip, curling slightly at the tip like a small hook. Take care not to over-beat the meringue.


Make the vanilla and chocolate cake batters
- Step 9: Add a scoop of meringue to the yolk mixture, stirring until very smooth to lighten it. Then fold in ½ of the remaining meringue with a rubber spatula or hand whisk until well incorporated.
- Step 10: Next, gently fold in ½ of the flour mixture until well combined.
- Step 11: Repeat again, this time with all the remaining meringue.
- Step 12: Fold in all the rest of the flour mixture until well combined.


- Step 13: Stir together the oil, milk, and vanilla extract until you get a smooth emulsion. Fold into the cake batter in 2 to 3 lots, as gently as you can without deflating the trapped air bubbles, until it’s well incorporated. The final batter should be light and foamy with no visible streaks of meringue or flour.
- Step 14: To make the cocoa batter, take 250 grams of the vanilla batter and gently fold in the cocoa powder. You now have 2 separate batters.


Fill the pan with alternating cake batters
- 1st layer: Alternate the vanilla and cocoa batters twice, so you have 2 of each batter. The vanilla portions should be slightly larger than the cocoa.
- 2nd layer: Start the 2nd layer by covering the vanilla batter with cocoa batter, and covering the cocoa batter with the vanilla batter.
- 3rd layer: Repeat this alternating pattern for the 3rd layer.
- 4th layer: Cover with the remaining vanilla batter and smoothen the surface. Whatever cocoa batter you have left, drizzle it on top.


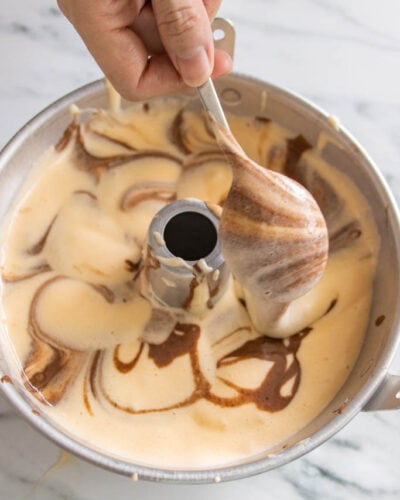
Marble the cake batters and bake
- Using a metal spoon, gently scoop up the batter from the bottom of the pan to the top like making the letter ‘U’. Go around the chiffon pan once, no more than twice, and only in places you might have missed the first time around. Do not overdo it, otherwise, the pattern won’t be distinct or clear.
- Bake for 45 to 50 minutes. Don’t open the oven door. Test for doneness by inserting a skewer into the centre of the cake. Once it comes out clean, remove the pan from the oven. Note: Expect some cracks on the surface of the cake during baking.


Cool the cake and release
- Invert the pan immediately and let it ‘hang’ until the pan is warm to the touch but not too hot to handle, at least 20 minutes.
- To release, you can use the hand technique (watch the hand technique in this video) to get smooth sides like the marble cake you see here.
- Alternatively, run a sharp knife or offset spatula gently around the sides of the pan, pressing against the pan as much as possible. Then invert the pan again so that the bottom is now facing up. Gently tap or push the pan’s base to loosen the cake from the sides of the pan. Then run the knife or spatula around the base to release the funnel.


Frequently asked questions
You may have over-whipped the meringue. Also, it’s important to stick to the recipe quantities. I recommend using a digital scale for accurary.
If the cake lacks height and the crumb is dense, an under-whipped meringue. A meringue which lacks good volume will lose even more air by the time you’ve worked it into the batter.
But, this can also happen with an over-whipped meringue which tends to clump in the batter. As a result, it takes more folds to incorporate it, causing precious air bubbles to escape.
Last but not lease, check your baking powder if it’s been sitting in your pantry for a while. Test to see if it’s still fresh.
Over mixing will deflate the batter, losing precious air bubbles. Again, baking powder could be the culprit if it’s no longer fresh.
This points to a poor or uneven mixing of the flour mixture. Sifting the dry ingredients breaks down any lumps beforehand and ensures the flour is as loose as possible.
The cake is under-baked. I’ve suggested these baking times as guidelines. Ovens typically have ‘hot’ or ‘cool’ spots or may loose calibration over time, so the internal temperature can differ from the temperature you set your oven to. For accuracy, use an oven thermometer to make sure the oven is at the desired baking temperature.

How to store a chiffon cake
Marble chiffon cake will keep well in an air-tight container at room temperature for 2 to 3 days, and in the chiller for up to 5 days. To freeze, wrap the whole cake or individual slices in two layers of cling wrap and place in a freezer bag for up to 2 months.
When you’re ready to enjoy the cake, remove the bag from the freezer. Then thaw overnight in the chiller. Unwrap and microwave individual slices for 15 – 20 seconds on medium or medium-high power setting (between 400 – 600W) to make it as soft and airy as fresh baked.
Why this marble chiffon cake is worth it
This marble chiffon cake recipe is beginner-friendly, even for first-timers. I’m confident that if you follow the recipe through the steps, sticking to my tips to help you along the process, you’ll be utterly delighted by the result!

Save for Later:Marble Chiffon Cake
Pin this on PinterestHere are more cake recipes to inspire your next bake:
- Soft & Moist Chocolate Vanilla Marble Cake
- Marble Mini Bundt Cakes
- Matcha Chiffon Cake
- Cotton-Soft Chocolate Chiffon Cake {Recipe Update!}
- Vanilla Chiffon Cake + Tips for the Perfect Chiffon Bake
- Vanilla Swiss Rolls (a.k.a Vanilla Roll Cakes)
- Moist Chocolate Cake – Every Baker’s Essential Recipe
Marble Chiffon Cake

Ingredients
- 100 g cake flour
- 1 tsp baking powder
- ⅛ tsp pinch of salt
- 15 g Dutch-process cocoa powder See Note 1
- 90 g egg yolks (5 large egg yolks) See Note 2
- 50 g caster sugar
- 65 g full cream milk See Note 3
- 60 g oil See Note 4
- 1 tsp vanilla extract
For the meringue
- 240 g egg whites (6 large egg whites) See Note 2
- 75 g caster sugar
- ½ tsp cream of tartar
Instructions
- Preheat oven to 170°C (338°F). Position the oven rack on the lowest in the oven. Have a 20-cm (8-inch) chiffon tube pan ready. DO NOT GREASE.
- Sift the dry ingredients: Sift together cake flour, baking powder, and salt. Separately, sift the cocoa powder.
- Beat the egg yolks: Using hand-held beaters or a stand mixer fitted with a whisk, lightly beat egg yolks on medium speed for a few seconds. Add sugar and continue beating until the yolks become pale, thick, and glossy. This will take about 3 – 5 minutes. Wash and dry the whisk attachment for the next step.
Make the meringue:
- In a large and grease-free mixing bowl, combine egg whites, cream of tartar, and a teaspoon of sugar. Whip on medium speed until the egg whites become thick and cloudy. Note: If using handheld beaters or a hand whisk, keep beating in one direction only, i.e. clockwise or anti-clockwise.
- Add the caster sugar in 2 to 3 lots, and continue whipping until the meringue becomes smooth, glossy, and form stiff peaks when the whisk is lifted. This may take 5 to 7 minutes, depending on your mixer and speed.
Make the vanilla cake batter:
- Add a scoop (about 1 cup) of meringue to the yolk mixture and mix well until the mixture is very smooth.
- Fold in the meringue and flour mixtures: Then fold in ½ of the remaining meringue with a rubber spatula or hand whisk until well incorporated. Next, gently fold in ½ of the flour mixture until well combined. Then repeat folding with all the remaining meringue, followed by all the remaining flour mixture until well combined.
- Fold in the liquids: In a small bowl, combine oil, milk, and vanilla extract. Stir until the mixture becomes a smooth emulsion. Fold into the cake batter in 2 to 3 additions, each time mixing into the batter gently without deflating the trapped air bubbles and until well incorporated.
Make the cocoa cake batter:
- Scoop out 250 grams of the cake batter into a separate bowl. Gently fold in the cocoa powder until well mixed.
Fill the pan:
- Make the first layer by alternating the vanilla and cocoa batters twice, so you have 2 of each batter. The vanilla portions should be slightly larger than the cocoa.
- Start the second layer by covering the vanilla batter with cocoa batter, and covering the cocoa batter with the vanilla batter. Repeat this alternating pattern for the third layer.
- Make the fourth and final layer by covering the previous layer with all the remaining vanilla batter. Smoothen the top. If you're left with just a bit of cocoa batter, drizzle it on top.
Marble the batter:
- Using a metal spoon, gently scoop up the batter from the bottom of the pan to the top like the letter 'U'. Go around the chiffon pan once, no more than twice, and only in places you might have missed the first time around. Do not overdo it, otherwise, the pattern won't be distinct or clear.
Bake and cool:
- Bake for 45 to 50 minutes, or until done. DO NOT open the oven door. Check about 5 minutes before the end of baking, to test for doneness. When a skewer inserted into the centre comes out clean, the cake is done. Note: Cracking on the surface of the cake during baking is to be expected!
- Once the pan is removed from the oven, invert immediately and let it 'hang' until the pan is warm to the touch but not too hot to handle, at least 20 minutes.
Remove the cake:
- Remove by hand for smooth sides: Watch the hand technique in this video. Press down your hand gently on the cake to nudge it away from the side of the pan. Keep nudging bit by bit, working around the edges of the cake. Then repeat, this time nudging more of the cake away from the sides but deeper down the pan. Keep repeating until you've released the cake totally from the sides of the pan. Then invert the cake pan and gently press on the base until it comes loose. Finally, gently press the cake away from the funnel to release it.
- Remove with offset spatula or knife: Run an offset spatula or sharp knife gently around the sides of the pan, pressing against the pan as much as possible. Then invert the pan again so that the bottom is now facing up. Gently tap or push the pan’s base to loosen the cake from the sides of the pan. Then run the spatula or knife around the base to release the funnel. Chiffon cake is served ‘upside-down’.

